Cardiac Segmentation#
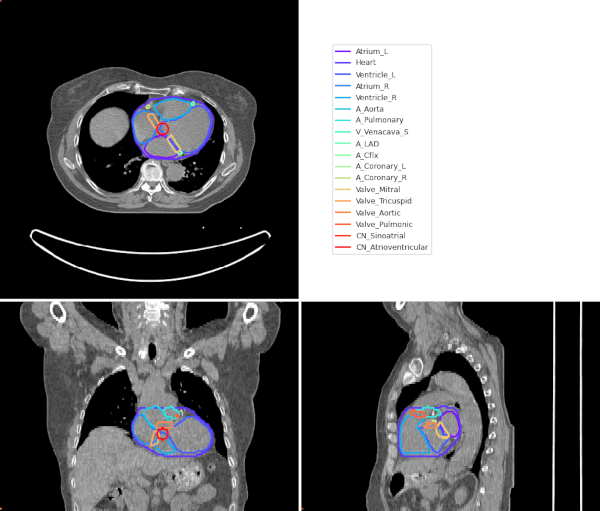
This project consists of an algorithm to automatically segment the heart plus 17 cardiac sub-structures in typical Radiotherapy CT scans. The hybrid algorithm [1] first segments the whole heart using a deep learning model (nnUNet [2]) followed by a multi-atlas based mapping of the cardiac sub-structures [3] and finally geometric modelling of smaller cardiac structures. The following cardiac structures are generated by the auto-segmentation algorithm. By default, structure names are formatted to conform to the TG-263 guidelines:
Structure |
Name |
|---|---|
Whole Heart |
Heart |
Left Ventricle |
Ventricle_L |
Right Ventricle |
Ventricle_R |
Left Atrium |
Atrium_L |
Right Atrium |
Atrium_R |
Aorta Artery |
A_Aorta |
Pulmonary Artery |
A_Pulmonary |
Left Anterior Descending Artery |
A_LAD |
Circonflex Artery |
A_Cflx |
Left Coronary Artery |
A_Coronary_L |
Right Coronary Artery |
A_Coronary_R |
Superior Vena Cava |
V_Venacava_S |
Mitral Valve |
Valve_Mitral |
Tricuspid Valve |
Valve_Tricuspid |
Aortic Valve |
Valve_Aortic |
Pulmonic Valve |
Valve_Pulmonic |
Sinoatrial Conduction Node |
CN_Sinoatrial |
Atrioventricular Conduction Node |
CN_Atrioventricular |
Quickstart#
These steps have been tested on an Ubuntu 20.04 operating system using Python 3.8. Other Linux operating systems and Python versions 3.7-3.9 are expected to work. This tool is untested and likely won’t run on a Windows operating system at this time (contributions are welcome).
System Requirements#
On a system with the following specifications, one case takes approximately 5 minutes process:
24 core Intel i9 processor
64GB RAM
NVIDIA 3090 GPU
The tool will run on a system with lower specifications, however a GPU is recommended.
Note: The nnUNet model as well as the cardiac atlas will be downloaded which will increase the runtime on the first run.
Installation#
Install PlatiPy with the required extras (cardiac extra installs some additional libraries needed for the cardiac auto-segmentation):
pip install platipy[cardiac]
Run from a Python script#
This code snippet first pulls some Lung CT data into a folder called data. Next it runs the
auto-segmentation algorithm on one example case and saves the results within the patient directory.
import platipy

from matplotlib import pyplot as plt

import SimpleITK as sitk

from platipy.imaging.tests.data import get_lung_nifti
from platipy.imaging.projects.cardiac.run import run_hybrid_segmentation
from platipy.imaging import ImageVisualiser
from platipy.imaging.label.utils import get_com

# Download the test data
data_path = get_lung_nifti()

# Pick out a case to run on
test_pat_path = data_path.joinpath("LCTSC-Test-S1-201")
test_image = sitk.ReadImage(str(test_pat_path.joinpath("IMAGES/LCTSC_TEST_S1_201_0_CT_0.nii.gz")))

# Compute the auto-segmented sub-structures
auto_structures, _ = run_hybrid_segmentation(test_image)

# Save the results
output_directory = test_pat_path.joinpath("substructures")
output_directory.mkdir(exist_ok=True)

for struct_name in list(auto_structures.keys()):
    sitk.WriteImage(auto_structures[struct_name], str(output_directory.joinpath(f"{struct_name}.nii.gz")))

print(f"Segmentations saved to: {output_directory}")

# Visualise the results and save a snapshot
vis = ImageVisualiser(test_image, cut=get_com(auto_structures["Heart"]))
vis.add_contour({struct: auto_structures[struct] for struct in auto_structures.keys()})
fig = vis.show()
plt.savefig(output_directory.joinpath(f"snapshot.png"))
Run from Command Line Interface (CLI)#
This command assumes you have a thorax CT image stored in Nifti format at the location
/path/to/ct.nii.gz:
platipy segmentation cardiac -o /path/to/output_folder /path/to/ct.nii.gz
Run from a Jupyter Notebook#
A Jupyter Notebook is available containing an example.
Left Ventricle 17 Segment Model#
PlatiPy provides a tool for automatically segmenting the 17 Left Ventricle segments as defined in: https://www.ahajournals.org/doi/pdf/10.1161/hc0402.102975
A Jupyter Notebook is provided containing an example to segment the 17 segments. This can be combined with the output of the Cardiac auto-segmentation example above.
Troubleshooting#
Problem: I get an error message indicating a CUDA error: no kernel image is available for execution on the device#
Solution: The pytorch version installed via the usual pip command above isn’t always necessarily the correct version needed for your operating system and CUDA version. Follow instructions here to install the correct version of pytorch.
Problem: Installing PlatiPy hangs or indicates a dependency error#
Solution: Upgrade your version of pip and try again: pip install --upgrade pip
Problem: I’m unable to run the example Jupyter Notebook on Google Colab#
Solution: Create a new code cell and upgrade the version of pip. Then reinstall the platipy library:
!pip install --upgrade pip
!pip install platipy[cardiac]
If you continue to experience issues, restart the Colab runtime (Runtime->Restart Runtime) and try again.
If you are experiencing other issues, please consider reporting these in the PlatiPy GitHub issue tracker. Any contributions to the code via pull requests would be appreciated.
References#
Finnegan, RN, Chin, V, Chlap, P, et al. Open-source, fully-automated hybrid cardiac substructure segmentation: development and optimisation. Phys Eng Sci Med. 2023. doi:10.1007/s13246-023-01231-w
Isensee F, Jaeger PF, Kohl SAA, Petersen J, Maier-Hein KH. nnU-Net: a self-configuring method for deep learning-based biomedical image segmentation. Nat Methods. 2021;18(2):203-211. doi:10.1038/s41592-020-01008-z
Finnegan R, Dowling J, Koh E-S, et al. Feasibility of multi-atlas cardiac segmentation from thoracic planning CT in a probabilistic framework. Phys Med Biol. 2019;64(8):085006. doi:10.1088/1361-6560/ab0ea6